Setting Up a dedicated User in Funnel
Why do I need to setup a new user?
1. Log in to Funnel with Admin Privileges
2. Go to User Management
- Click Settings (bottom left)
- Select Users from the menu
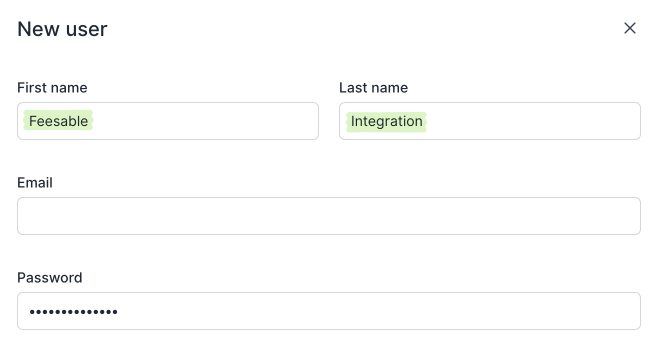
3. Click Add New User and enter the following details:
- First name: Feesable
- Last name: Integration
- Email: Use a unique email address not already used for a Funnel login. This email should be accessible for verification and future access if required
- Password: Set a secure password and store
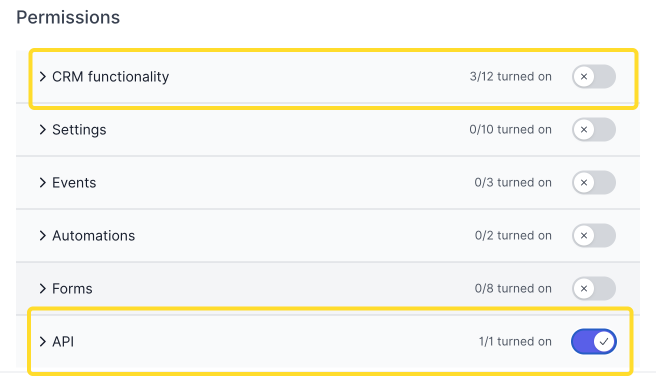
4. Set Permissions
- under Permissions, expand CRM functionality and enable only:
- Edit leads
- Notes
- Activities
- Leave all other CRM permissions disabled
- Scroll down and enable API access
5. Click Create user to save.
Integration Setup in the Feesable Portal
1. Log into the Feesable Portal and navigate to Integrations in the left menu
2. Digistorm Funnel Settings
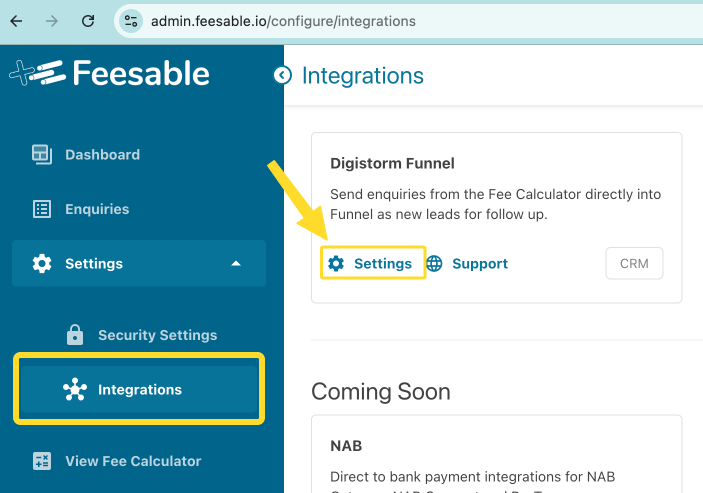
- Find the Digistorm Funnel integration
- Click on Settings
- Leave this Settings window open ready to copy data in
3. In a new tab, log into the new Digistorm Funnel account that you just setup (in the step above)
- you may need to log out of your existing account, or open in a new browser or incognito mode
- Access API Settings in Funnel by clicking on Settings (bottom left in Funnel)
- Select My Funnel
- Scroll down to the API section
4. Generate a New API Token and copy
- Click New access token button
- Copy the API Token by clicking Copy Token button
- Go back to the Feesable Portal tab with Funnel Settings page open and paste this token into the Funnel API Token field in Feesable.
5. Get the API URL
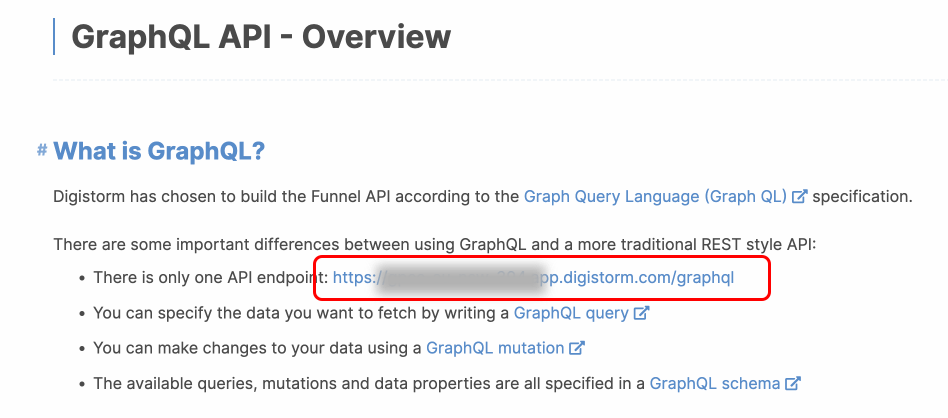
- On the API settings panel in Funnel, click the GraphQL API link
- On the page that has just opened, copy the API endpoint URL (on the line “There is only one API endpoint”)
- Go back to the Feesable Portal tab with Funnel Settings page open and paste the copied URL into the API URL field
6. Check the Connection in Feesable
- Click Check Connection
- This will test your credentials and fetch settings from Funnel
7. Map Fields in Feesable & Save
- Map each Feesable field to the corresponding Funnel field
- Once all fields have been matched, click Save
8. Test the connection
- To test, click View Fee Calculator in the Portal and submit a test submission on the fee calculator, making sure you complete the parent details contact form to send a new lead to Funnel
- Go to the Leads page in Funnel to check if the new test submission is in the list (it should be available instantly, but could take up to a few minutes)
Note: You can temporarily disable the Funnel integration at any time by toggling the switch on the Integrations page.